Different plan permissions – Figma Learn – who should have access to your prototype?
I often use cooking examples, so please bear with me as I do it again 🤣
Imagine you’re whipping up a secret recipe in your kitchen.
You’ve got the perfect balance of ingredients—a pinch here, a dash there, and it’s all coming together beautifully.
Now, imagine that your kitchen has a giant window.
Friends, neighbors, and even that random dog walker can see your culinary masterpiece in real-time.
Everyone’s offering their two cents—some helpful, some, well, not so much.
This is exactly how Figma feels.
One of Figma’s most fabulous features—real-time sharing—can also be a bit of a double-edged sword.
Your clients receive a front-row seat to your creative process, watching as your designs evolve.
No more email chains and PDF attachments.
No more cryptic comments.
With Figma, you know exactly which part of the design they’re talking about, and they can see if their feedback’s already been actioned.
It sounds like a dream, right?
Yet, this convenience comes with its own set of headaches.
Like navigating a labyrinth of sharing options and access permissions.
Why are there so many? And why do they matter?
Well, let’s just say that ignorance isn’t bliss here.
A single misstep in access permissions can turn your well-oiled machine into a chaotic mess.
Missed files, lost versions, and you might end up with a Franken-design far from what you started.
Pair this with a communication breakdown, and you’ve got a recipe for disaster.
But don’t worry! Keep reading as we’ll demystify the different types of assets you can share in Figma: files, prototypes, projects, and teams.
Plus, we’ll uncover why nailing your access permissions is crucial.
Get ready to navigate Figma’s features with the finesse of a master chef in their kitchen. It’s time to serve up some perfection!
(Yep, I’ll keep writing cooking-related intros 🍗🍕)
Understanding the different levels of sharing on Figma and their default permissions
Before diving into the specifics, let’s cover the basics.
Figma lets you share different types of assets at various levels, and typically, granting access at a higher level (like a team) will automatically grant access to the levels below it (like projects and files).
Here are the main levels of access in Figma:
- Files: individual design files.
- Prototypes: interactive prototypes created from design files.
- Projects: collections of files and prototypes organized into projects.
- Teams: the entire team and their projects, files, and prototypes.
- Organization: the entire organization and the teams, projects, and files in it. This is applicable only if you’re part of an organization or enterprise plan in Figma.
Are you catching on so far?
If you share a project, the person is given default permissions to view the files and prototypes within that project.
However, they don’t have to be a part of the team the project was on.
They won’t see the rest of the files of the team unless you give them access.
If you give someone team-level permissions, they can view team files and projects.
The number of access levels you have will depend on your Figma plan.
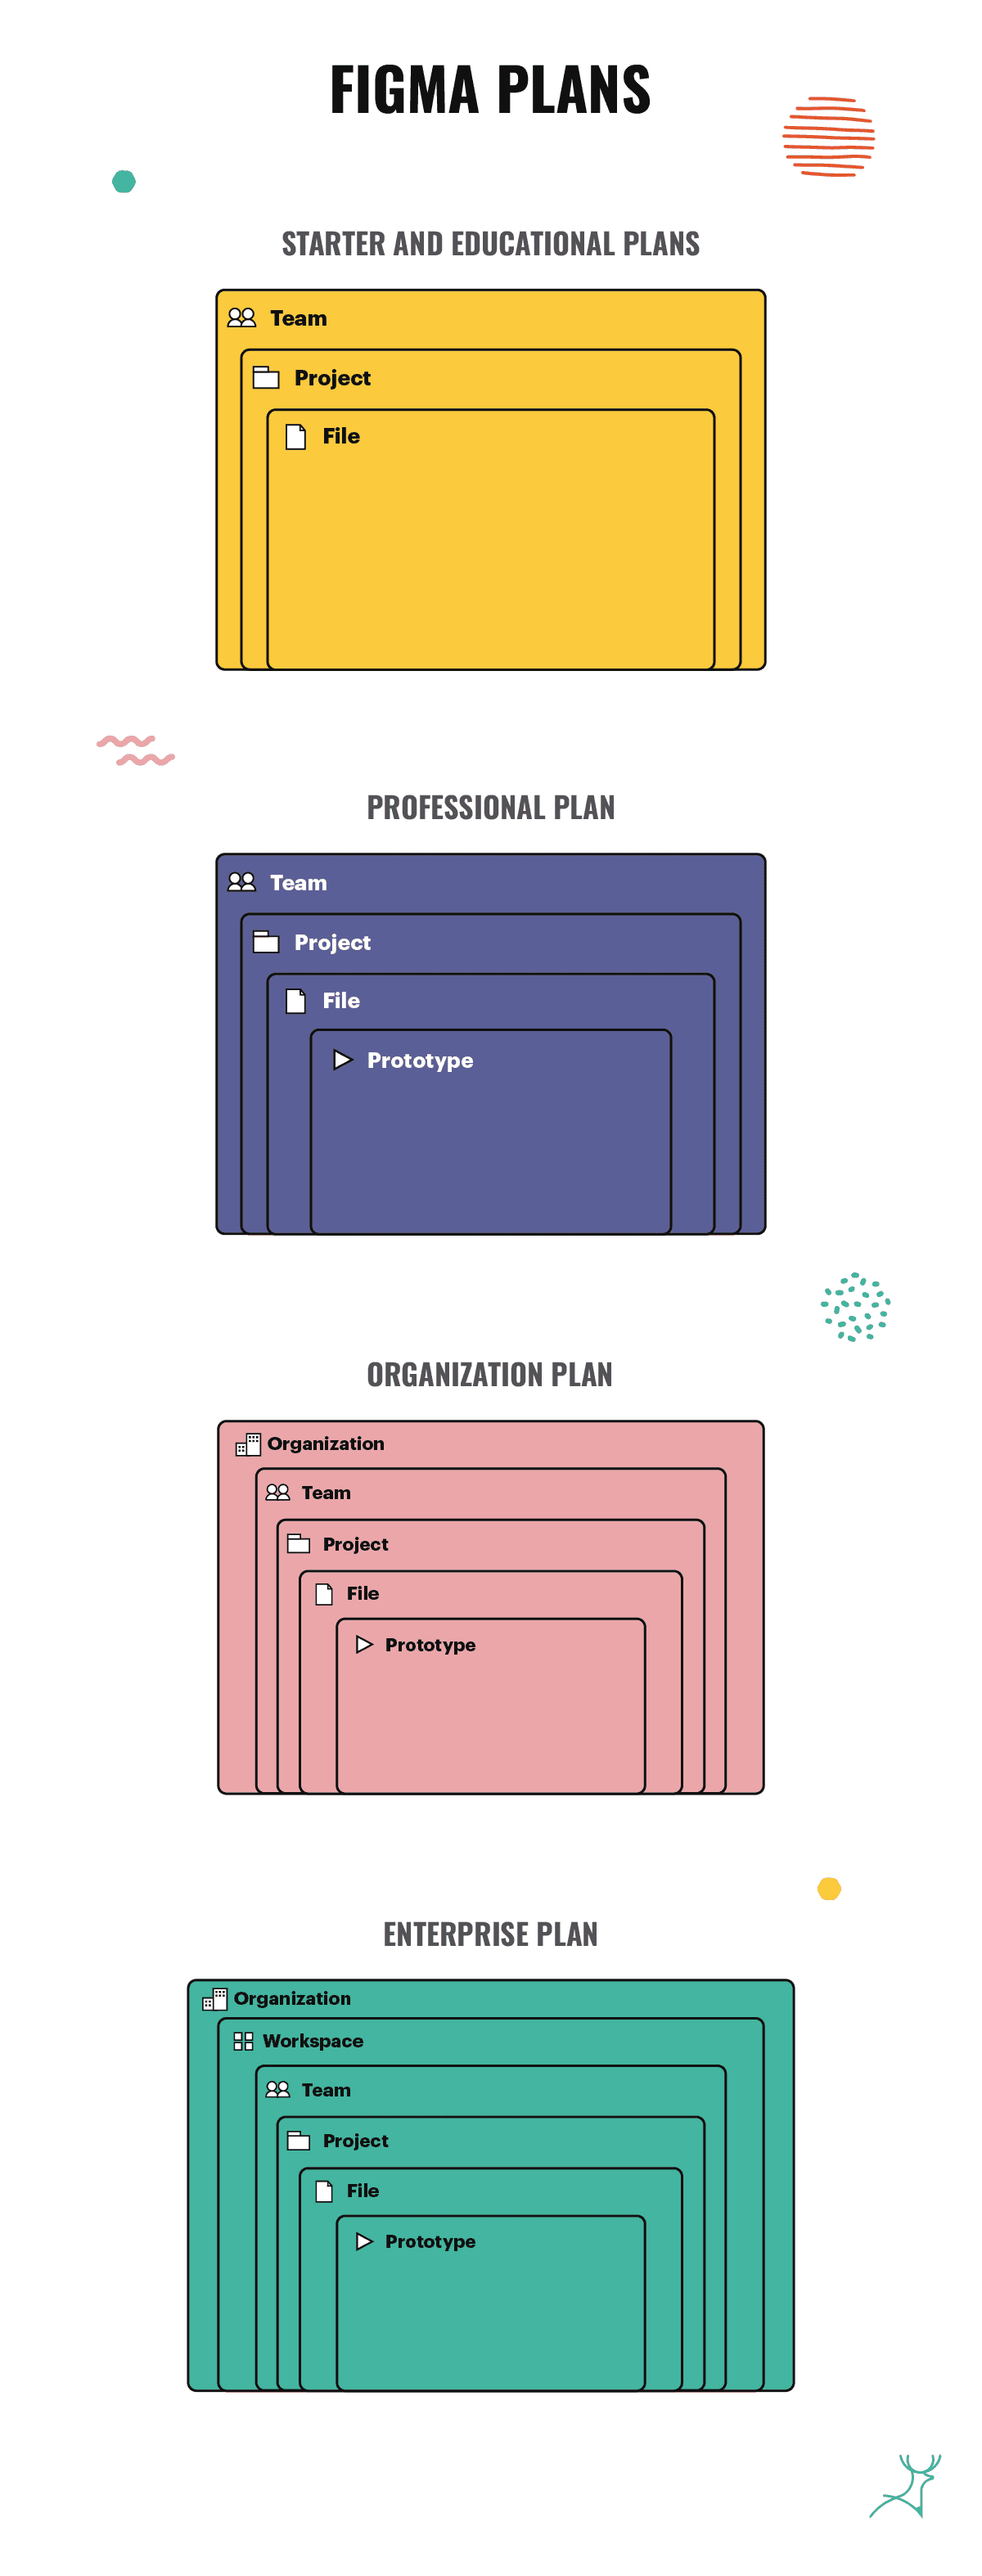
The starter and educational plans have the basic team>project>file access permissions.
The higher-paid plans, like the enterprise and organization plans, have more levels, allowing them to collaborate differently and more securely.
Now that you know the different levels of access, let’s get to understanding how you can share the resources in these assets.
Share assets by sending your client a link
This is the fastest way to give people access to your files. It’s also what we prefer to use—straightforward and less confusing.
You just go to share, set your permissions, copy, and share the link with your client.
When you share a link to a team, file, or prototype, your client can view it easily. You might be concerned about security, as you should.
What if your client copy-pastes this link and gives someone access without you knowing?
What if the link leaks online and who knows who gets access to your files?
This method has a couple of safeguards.
Even though the link gives people access, the way they can interact with your files will depend on their existing permissions or how you set it with the default link-sharing settings. (Hang in there; we’ll talk about these in a bit.)
Your team admins can also reset or turn off invite links.
This protects your files if your client does not click the link or if they have already viewed and you don’t want to risk anyone else seeing the files.
How to set default permissions for sharing links
There are a variety of link sharing options for Figma files and prototypes and you can grant different levels of access.
Yes, it is confusing, but this works best for the security of your designs.
That’s if you understand how each permission works.
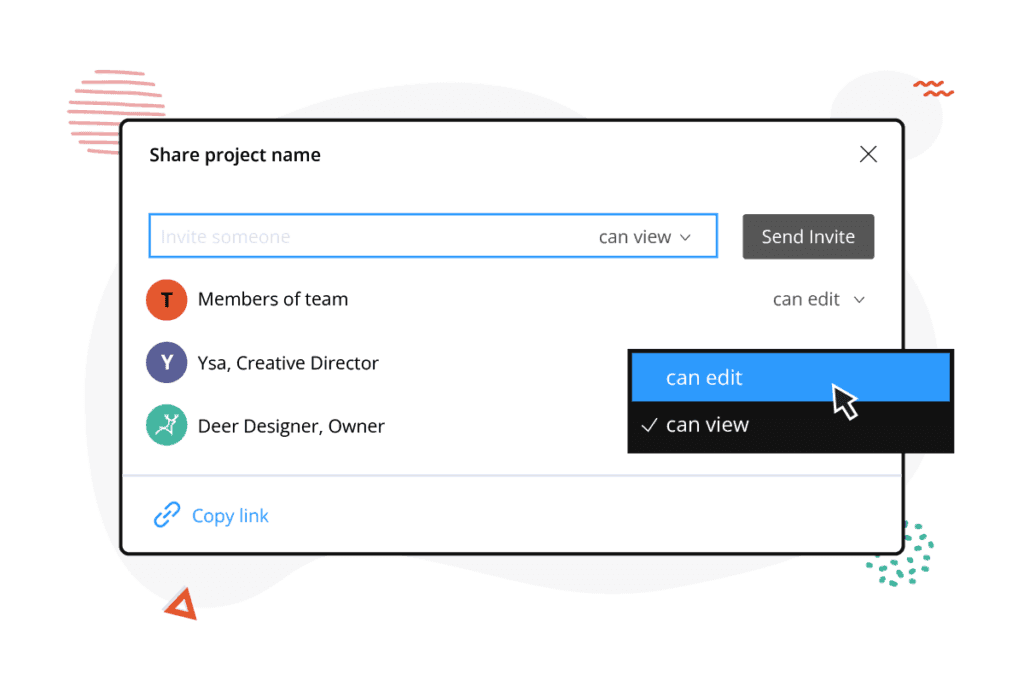
When you click the “share” button, you are shown who has access to the file or project and what type of access they have.
- View only: The recipient can access the file but cannot make any changes.
- Comment only: The recipient can view and leave comments, which is useful for feedback without altering the design.
- Edit: The recipient can view, comment on, and edit files.
You can see these options in the share window under “who has access.”
Take note that if you set “who has access” to “anyone,” anybody who has this link can either view, comment, or edit the files.
Otherwise, the people who have the link will be prompted to login and confirm that they are in your team or organization.
You also have the option to require a password when opening the link or have a set expiration date for the links for extra security.
Sending an invite to the file, project, or team
The option to invite your client or design partner to work on the file, project, or team is in the same “share” window.
Just click “share” and enter their email address to invite them.
They will get an email invite and a notification on their Figma account.
This is the safest method, as you can actively see who has access to your files and you can select their specific permissions from the drop-down beside their name.
For example, you might not want too many people fiddling with the files.
You can set your client to have edit access while their other team members can have comment access so there are fewer people moving things around.
Be careful and take note of whether you are inviting a person to a file or team.
If you invite others to the team or organization, they will be able to access all the files and projects that your organization or team can access.
This may mean they can view and edit files other than the project you are working on.
If you don’t want to invite them to the team, make sure you are only inviting them to a specific file.
If you need several people at the team access level, review the team permissions.
You can set it to view or comment only if you are the team admin.
Embedding the file outside of Figma
In some cases, you might want to share your files or prototypes on a website or a browser-based application.
You can use this feature if you want people to interact and test your prototype or if you want to include it in a library for documentation.
Just like the shared link method, you can set the permissions on each embedded link.
You can set it to a public file so everyone can view the embed.
You can also set it to a private file, which people can either view or edit depending on the permission you set.
Users will have to be logged into Figma and pass authentication that they are members of your team or organization.
Best practices for team admins managing permissions on Figma
Now that you understand the different permissions and access levels you get for Figma files, let’s talk about how you can ensure the security of your files.
Assess the necessity of access
Before granting access, always ask yourself if the recipient truly needs it.
Providing “view-only” or “comment-only” access is often enough for clients or quality analysts who need to review or give feedback without making changes.
Think about it: do you need to give a CEO edit access to the file?
They don’t need to revise the files themselves since they have the rest of the design team to do that.
They might not even know how the assets stack up or where things should go.
Giving them edit access will risk them moving or deleting something important in your file!

Using role-based access
So you’re thinking less about what access you should give people, just set their access based on their roles and responsibilities.
Designers and developers actively working on the project should have edit access.
Quality analysts and clients might only need comment access.
People outside the team may or may not be given access, depending on how confidential your project is.
Regularly review access permissions
You should periodically review who has access to your files, prototypes, projects, teams, and organization, especially if you are working on confidential assets.
It helps to set passwords and expiration dates for links, especially if you are sharing Figma design files with people who don’t need to be actively working on the project.
Remove team access for individuals who no longer need it to maintain security and organization.
Educate your team and clients
You can’t expect people not to just give access to your files willy-nilly if they don’t even know the importance of these access links.
Your client might think it’s okay to share an edit link with a colleague to ask for their insight on a design.
How would they know they are compromising the security of the entire project?
The next thing you know, your design has been edited by someone you don’t know or has been shared online for all of the world to see and edit!

Make sure that everyone understands the implications of their access level.
At Deer Designer, we regularly provide training and documentation on how to use Figma effectively without compromising the integrity of our clients’s designs.
Giving the right permission and access to Figma files
While it’s easy to share Figma files and collaborate with multiple teams in real-time with Figma, this same feature of varied access and permissions can make it difficult to take control over your design process.
When you give the wrong access to people, you might have too many people moving files around and making changes you can’t track.
Managing access permissions in Figma is a vital part of maintaining control over your design process.
By understanding the different levels of access and their implications, you can make sure that your work remains secure while still fostering effective collaboration.
Don’t want to bother understanding all these design permissions while working on your designs?
Let Deer Designer handle it for you!
Just send a request and we’ll take care of the design process and sharing.
All you have to do is review and approve the designs.
Key takeaways
- Figma Design and Figjam are convenient for teams to collaborate and share assets in real-time, but giving people the right permissions on the file can be a challenge.
- Depending on your team or plan, you can share assets such as files, prototypes, projects, teams, and organizations.
- To share files, you can share links to files, invite people through their email addresses, or embed a link to a website.
- Different permissions determine what files users can view and whether they can comment on or edit the files. This can be set in the default permissions for shared links.
- Access to team files and organizations should be limited to prevent leaking permissions and files being changed without the rest of the team knowing.
- A person’s permissions should depend on their role. If they don’t need to edit the files, you can just give them view or comment access to designs.